1. Open template, duplicate (shift + D),
close original, delete copyright layer,
floodfill background with white,
and change the canvas size to 480 X 480.
2. Make "heart line" your active layer.
selections > select all
selections > float
selections > defloat
selections > invert
Copy and paste "paper 17" and press delete.
selections > select none
layers > merge > merge down
3. Do the same steps for "large heart"
but use "paper 8" and resize the paper
40% first.
4. Follow the same steps for
"small heart" but use "paper 12" and
resize the paper 40% first.
5. Follow the same steps for
"frame background" but use "paper 2".
6. Duplicate "frame", copy and
paste your tube, resize if needed,
erase any part of your tube that you
don't want showing, make your top
frame active, and erase any part where
you want your tube to show through.
7. Copy and paste "rose 1", resize 25%,
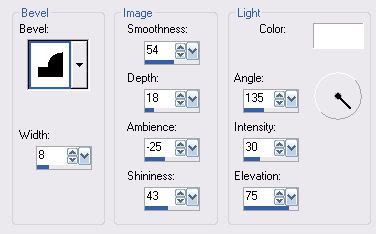
add dropshadow, duplicate, and
place on the top outside corners
of your frame layer.
8. Copy and paste "bow 1", resize 50%,
add dropshadow, and place on
the top left of the large heart.
9. Copy and paste "bracelet 1", resize 25%,
free rotate right 30, use my tag
as a reference for placement, and
erase any part that goes outside of the heart.
10. Set foreground to white and
background to #d5292e.
Using your text tool set to
Edwardian Script 48 stroke width 1,
add desired text, convert to raster layer,
and add dropshadow.
Add copyright and watermark,
and resize all layers 80%.
Save and you're finished!
____________________________
tutorial ©Lynnca February 2009
No reproductions in part or in whole are allowed.
You can use my tutorials for challenges
as long as you provide the link only.