Wednesday, May 13, 2009

Misunderstood

Supplies Needed

scrapkit: I used PTU kit Suz All Nighter
by Created By Jill

tubes: I used Goth Girl by
Perfect Posers
_____________________________

Let's get started!

1. Open a 600 x 600 white canvas.

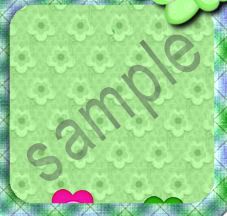
2. Copy and paste "frame 9",
resize 75%.
Using your magic wand, select
the inside of each of the
frames, expand by 4, invert,
copy "paperh" and paste as a
new layer, press delete, then
select none.
Duplicate your frame layer.

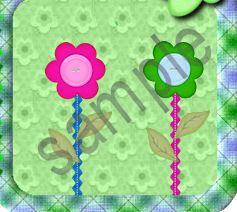
3. Copy and paste tube "gg2",
resize 40% and place on the
left 2 frames, between the 2
frame layers.
Erase any part of your tube
that you don't want showing
outside of the frames.
Make the top frame layer active
and erase any part where you
would like your tube to show
through.

4. Copy and paste tube "gg3",
resize 70%, place in top right
frame, and erase anything that
does not fit in the frame.
Set blend mode to luminance
legacy.

5. Follow the same
instructions for the bottom
right frame using tube "gg4".

6. Copy and paste "bow 4",
resize 20%, free rotate right 20,
place on the top right corner of
the frame layer, duplicate,
mirror, and place on the top left
corner.
Duplicate both, flip both, and
place on the bottom corners.

7. Copy and paste "candle2",
resize 25%, place in the bottom
left corner of your tag,
duplicate, and mirror.

8. Set foreground to null and
back ground to #340001.
Using your text tool set to
Bickley Script 72, add desired
text, convert to raster layer,
and place at the bottom of your
tag, between the 2 candles.

9. Add watermark and copyright.
Resize all layers 80%.
Save and you're finished!
________________________________
tutorial ©Lynnca May 2009
No reproductions in part or in whole are allowed.
You can use my tutorials for challenges
as long as you provide the link only.

Private Property


Supplies Needed
scrapkit: I used PTU Demon Circle by Maggie's Scraps

tube: I used Goth Girl by
Perfect Posers
___________________________

Let's get started!

1. Open a 600 x 600 white
canvas.

2. Copy and paste "sign 05",
add dropshadow, and place a
little lower than right in the
middle of your tag.

3. Copy and paste tube "gg1",
resize 25%, add dropshadow,
and place on top of the sign.

4. Copy and paste "bowdot02",
erase the silver loops off of the
two ends of the bow, resize 25,
place on to right corner of
sign, duplicate, and mirror.

5. Copy and paste "bigrose03",
resize 35, free rotate right 40,
place on bottom right corner of
sign, duplicate, and mirror.

6. Copy and paste
"metalflower03", resize 50%,
and place under the top left
corner of sign.
Duplicate as many times as
you need to form a semi circle
going from that corner to the
top right corner of the sign and
merge all flower layers
together.

7. Set background to #830000,
and foreground to white.
Using your text tool set to
Edwarian Script 72 stroke
width 1, add desired text,
convert to raster layer, add
dropshadow, and place under
sign.

8. Add copyright and watermark.
Resize all layers 80%.
Save and you're finished!
___________________________
tutorial ©Lynnca May 2009
No reproductions in part or in whole are allowed.
You can use my tutorials for challenges
as long as you provide the link only.

Tuesday, April 21, 2009

Butterfly Ballerina

Supplies Needed
scrapkit: I used "Madame Butterfly"
by Perfect Posers
tube of choice: I used one of the
beautiful 2 posers that come
with the scrapkit

____________________________

Let's get started!


1. Open a 600 x 600 transparent canvas.

selections > select all

Copy and paste "bp26" into selection.

selections > select none


2. Copy and paste "bp11", resize 10%, duplicate as many times as you need to make the top half of a circle shaped frame, merge flowers together, duplicate, flip, merge two frame halves together, add dropshadow, and duplicate the finished frame.


3. Copy and paste "bp22", resize 35%, and place between the two frame layers.


4. Erase any part of the tube that you don't want showing outside of the frame.

Make the top frame layer active and erase any parts where you would like the tube to show through.

Add a light dropshadow to the tube layer.


5. Copy and paste "bp10", resize 20%, place in bottom right corner, duplicate, mirror, add light dropshadow to both.


6. Copy and paste "bp15", resize 30%, place on left side of frame at the middle, duplicate, mirror, and add dropshadow to both.


7. Copy and paste "bp15" again, resize 20%, place on left side of frame above and a little to the right of the first one, duplicate, mirror, and add dropshadow.

Duplicate this finished layer and place below the original butterflies.


8. Set foreground to null and background to white.


9. Using your text tool set to Edwardian Script 48, add text, convert to raster layer, add dropshadow, and place between flowers at the bottom of your tag.


10. Add copyright and watermark.Resize all layers 80%.Save and you're finished!

____________________________

tutorial ©Lynnca April 2009
No reproductions in part or in whole are allowed.
You can use my tutorials for challenges
as long as you provide the link only.


Tuesday, April 7, 2009

Peace


Supplies Needed

scrapkit: I used ptu kit "Groovylicious"
by Creative Intentionz

tubes of choice: I used two that come
with the scrapkit that I used.

mask: I used ftu "mask 95"
by Weescotslass (go to navigate
then downloads)

___________________________

Let's get started!

1. Open a 600 x 600 white canvas.
Open mask and minimize.

2. Add a new raster layer, selections >
select all, copy and paste "paper 7" into
selection, and selections > select none.

3. layers > new mask layer > from image
layers > merge > merge group

4. Copy and paste "clipart 13",
resize 70%, add dropshadow,
and place in middle of tag.

5. Copy and paste "clipart 11",
resize 60%, add dropshadow,
and place in bottom right
corner of tag.


6. Copy and paste "clipart 9",
resize 60%, mirror, add dropshadow,
place in bottom left corner of tag.

7. Set foreground to black and
to null.
Using your preset shapes, add a
circle the same size as the inner circle
of the masked layer.
Add a new raster layer.

8. Set foreground to 95f20e and
background to #fb5a23.
Using your text tool set to Impact 48
stroke width 4, bring your cursor
down to the top of your preset
shape and add your text.
Convert to raster layer and
add inner bevel.....


Add dropshadow of choice.
Hide layer with your preset shape.

9. Copy and paste "butterfly 3", resize 40%,
place on the left corner of the first
letter of your text, duplicate, mirror,
and place on the right corner
of the last letter of your text.

10. Add copyright and watermark.
Resize all layers 80%.
Save and you're finished!
___________________________

tutorial ©Lynnca April 2009
No reproductions in part or in whole are allowed.
You can use my tutorials for challenges
as long as you provide the link only.

Groovy Man..... Groovy


Supplies Needed

scrapkit: I used ptu kit "Groovylicious" by
Creative Intentionz
tubes of choice: I used two that come with
the scrapkit that I used.
_____________________________

Let's get started!

1. Open a 600 x 600 white canvas.

2. Copy and paste "clipart 4", resize 125%,
place in middle of tag, and duplicate.

3. Copy and paste "clipart 10", resize 80%,
and place on the right side of the peace
sign, between the two peace sign layers.

4. Copy and paste "clipart 8", and follow the
same instructions as above but place on
the left side.

5. Erase any parts of the tubes that you
don't want showing outside of the peace
sign.
Make the top peace sign your active layer
and erase any part where you want the
tubes to show through.

6. Copy and paste "flower 7", resize 25%,
place in the bottom left corner of tag, add
dropshadow, duplicate, and mirror.

7. Using the alpha provided with the kit,
spell out desired text, place at bottom of tag,
and add dropshadow.

8. Copy and paste "stars 6", resize 60%, and
place in top right corner of tag.

9. Copy and paste "bead string 1", resize
40%, place under the very middle star in the
group of stars, erase any part of the staples
that show from underneath the star, merge
the two together, duplicate, and mirror.

10. Copy and paste "butterfly 9", resize
20%, place above the first letter of your text,
duplicate, and mirror.
Merge the two butterflies together,
duplicate, and resize 75%.

11. Add copyright and watermark.
Resize all layers 80%.
Save and you're finished!

__________________________________
tutorial ©Lynnca April 2009
No reproductions in part or in whole are allowed.
You can use my tutorials for challenges
as long as you provide the link only.

Monday, April 6, 2009

Ladies Night

Photobucket
Supplies Needed

scrapkit: I used ptu "
Rave Craze"
by Kikeka Kits

tube of choice: The tube I used
came with the scrap kit

font: I used ftu
Senor Pooglins
_________________________
Let's get started!

1. Open a 600 x 600 transparent canvas.
selections > select all
Copy and paste "paper 15" into selection.
selections > select none

2. Set foreground to #5cf800 and
background to #f83cc0.
Using your text tool set to Senor Pooglins
100 stroke width 4, add desired text,
convert to raster layer, add dropshadow,
and place toward the bottom of your tag.

3. Copy and paste "girl 1", resize 35%, and
place on the first letter of your text.

4. Copy and paste "girl 3", resize 35%, and
place on the last letter of your text.

5. Copy and paste "girl 2", resize 50%, and
place in top of the middle letter of your text.

6. Copy and paste "dangle 3", resize 75%,
place on left side of tag, duplicate, mirror,
and add dropshadow to both.

7. Copy and paste "skull", resize 80%, and
place behind "girl 2".

8. Go back to your text, duplicate twice,
rename "1", "2", and "3".
Apply constellation with the following
settings to each layer, remembering to
click on "random seed" each time....
Photobucket
Hide "2" and "3".

9. Add watermark and copyright.
Resize all layers by 80%.

10. In PSP.....
edit > copy special > copy merged

11. In AS.....
edit > paste > as new animation

12. In PSP.....
Hide "1" and make "2" visible.
edit > copy special > copy merged

13. In AS.....
edit > paste > after current frame

14. In PSP.....
Hide "2" and make "3" visible.
edit > copy special > copy merged

15. In AS.....
edit > paste > after current frame
edit > select all
animation > frame properties (set to 15)

16. Save and you're finished!
_________________________

tutorial ©Lynnca April 2009
No reproductions in part or in whole are allowed.
You can use my tutorials for challenges
as long as you provide the link only.

Neon Craze

Photobucket

Supplies Needed
scrapkit: I used ptu "Rave Craze"
by Kikeka Kits

tube of choice: The tube I used
came with the scrap kit

font: I used ftu Senor Pooglins

_________________________


Let's get started!

1. Open a 600 x 600 white canvas.

2. Copy and paste "frame 2", resize 75%,
place in middle of tag and duplicate.

3. Copy and paste "girl 3", place
between the two frame layers,
erase any part of the tube that you
do not want showing outside of your frame,
make the frame layer active, and
erase any part of your frame
where you want your tube to show through.

4. Copy and paste "butterfly 3",
resize 15%, duplicate twice,
free rotate one of them right 30,
free rotate left 30, add dropshadow,
and place where desired.

5. Copy and paste "dangle curtain 2",
resize 25%, duplicate twice.
Free rotate one right 30, another left 30,
and place them so that all 3
stars are on top of each other.
Rename them "1" (the one rotated right),
"2" (the original one), and "3"
(the one rotated left).
Hide "2" and "3".

6. Copy and paste "heart 3", resize 25%,
free rotate right 20, add dropshadow,
place in the top right corner of
your tag, duplicate, and mirror.

7. Set foreground to #5cf800 and
background to #f83cc0.
Using your text tool set to
Senor Pooglins 48 stroke width 2,
add desired text, convert to raster layer, add
dropshadow, and place where desired.

8. Add copyright and watermark.
Resize all layers 80%.

9. In PSP.....
edit > copy special > copy merged

10. In AS.....
edit > paste > as new animation

11. In PSP.....
Hide "1" and make "2" visible.
edit > copy special > copy merged

12. In AS.....
edit > paste > after current frame

13. In PSP.....
Hide "2" and make "3" visible.
edit > copy special > copy merged

14. In AS.....
edit > paste > after current frame

15. In PSP.....
Hide "3" and make "2" visible.
edit > copy special > copy merged

16. In AS.....
edit > paste > after current frame
edit > select all
animation > frame properties (set to 20)

17. Save and you're finished!


_________________________

tutorial ©Lynnca April 2009
No reproductions in part or in whole are allowed.
You can use my tutorials for challenges
as long as you provide the link only.

Wednesday, April 1, 2009

Sunday


Supplies Needed:

scrapkit: I used "Sunday Treats"
by Dream Effectz

tubes of choice: I used 3 tubes
______________________________

Let's get started!

1. Open a 600 x 600 white canvas.
selections > select all
Open "paper 2" and paste into selection.
selections > select none

2. Copy and paste "sunday", resize 20%,
add dropshadow, and place in
middle of tag.

3. Copy and paste your tubes,
resize if needed, add dropshadows,
and place where desired
(or you can use my tag as a reference).

4. Set foreground to null and
background to pattern scale 50
using "paper 3".
Using your text tool set to
Impact 72, add desired text,
convert to raster layer,
and apply inner bevel.....
Photobucket
Apply dropshadow and place
where desired.

5. Add copyright and watermark.
Resize all layers 80%.
Save and you're finished!
______________________________
tutorial ©Lynnca April 2009
No reproductions in part or in whole are allowed.
You can use my tutorials for challenges
as long as you provide the link only.

Saturday, March 14, 2009

Alice In Vassia Land


Supplies Needed:


scrapkit: I used "Upside Down"

by Vassia's Designs which can

be purchased HERE


tube of choice: I used "LilAlice"

by Joel Adams which can

be purchased HERE

___________________________


Let's get started!


1. Open a 600 x 600 white canvas.


2. Copy and paste "frame 4", resize
70%, place in middle of frame, and
duplicate.


Using your magic wand, select the
inside of the bottom frame layer
(make sure to get all open areas),
expand by 4, invert, copy and paste
"paper 1", press delete, and select
none.


3. Copy and paste your tube, resize
as needed, add dropshadow, place
between the two frame layers, and
erase any part of the tube that you
don't want showing outside of your
frame.


Make your top frame layer active and
erase any part of the frame where
you want the tube to show through.


4. Copy and paste "flower 1", resize
20%, add dropshadow, duplicate, and
place them at the ends of the
ribbons.


5. Copy and paste "heart 1", resize
35%, add dropshadow, free rotate left
40, and place on the top left corner of
your frame.


6. Copy and paste "gem 1", resize
25%, duplicate 4 times, and place
down the right side of your frame.


Merge all of the gems together and
add a dropshadow of choice.


7. Set foreground to #07baa6 and
background to #e50daa.


Using your text tool set to Impact 72
stroke width 5, add desired text, free
rotate right 90, fill space on right side
of frame, convert to raster layer, and
add dropshadow.


8. Add copyright and watermark.


Resize all layers 80%.


Save and you're finished!


___________________________

tutorial ©Lynnca March 2009
No reproductions in part or in whole are allowed.
You can use my tutorials for challenges
as long as you provide the link only.

Friday, March 13, 2009

Unbalanced

Photobucket

Supplies Needed:

scrapkit: I used "Upside Down" by
Vassia's Designs which can be
purchased HERE

tube of choice: I used "Balance" by
PinUp Toons which can be purchased HERE

font of choice: I used Secret Recipe
which can be downloaded HERE

Xenofex 2 Constellation

Animation Shop

_____________________________

Let's get started!


1. Open a 600 x 600 white canvas.


2. Copy and paste "frame 6", resize
80%, place in middle of tag, and add
dropshadow.


3. Copy and paste "paper 9" and erase
anything that falls outside of the
frame area.

Duplicate twice, rename "1", "2", and
"3", and add constellation with the
following settings remembering to
click on "random seed" each time.....

Photobucket

Hide "2" and "3".


4. Copy and paste your tube, resize as
needed, add dropshadow, free rotate
right 180, place inside your frame, and
change the blend mode to luminance
legacy.


5. Copy and paste your tube again,
resize as needed, add dropshadow,
and place on the left side of your
frame.


6. Copy and paste "flower 6", resize
70%, add dropshadow, free rotate
right 30, and place on the top right
corner of your tag.


7. Copy and paste "flower 5", resize
50%, add dropshadow, place under
frame layer, duplicate, free rotate right
90, place both using my tag as a
reference, and erase any part showing
up inside your frame.


8. Set foreground to null and
background to #39f2f0.

Using your text tool set to Secret
Recipe 48, add desired text, convert to
raster layer, add dropshadow, and
place where desired.


9. Add copyright and watermark.

Resize all layers 80%.


10. In PSP.....

edit > copy special > copy merged


11. In AS.....

edit > paste > as new animation


12. In PSP.....Hide "1" and make "2" visible.

edit > copy special > copy merged


13. In AS.....

edit > paste > after current frame


14. In PSP.....

Hide "2" and make "3" visible.

edit > copy special > copy merged


15. In AS.....

edit > paste > after current frame

edit > select all

animation > frame properties (set to 15)


16. Save and you're finished!

_____________________________

tutorial ©Lynnca March 2009
No reproductions in part or in whole are allowed.
You can use my tutorials for challenges
as long as you provide the link only.

Tuesday, March 10, 2009

Spring Garden

Photobucket

Supplies Needed:

scrapkit: I used "Spring Ah Ling" by
SassyCee which can be purchased HERE

tube of choice: I used "Natural Beauty"
by Popeye Wong which can be
downloaded HERE

font: I used Chick by Fontalicious
which can be downloaded HERE

Animation Shop

_____________________________

Let's get started!


1. Open a 600 x 600 white canvas.


2. Copy and paste "frame 2", place in
middle of tag, and duplicate.

Using your magic wand, select the
inside of the top frame on both sides,
expand by 4, invert, copy and paste
"paper 6", press delete, and select none.


Make sure that this paper layer is below
your bottom frame layer.


3. Copy and paste tube and place
between your two frame layers on the
left side.

Erase any part of the tube that you
don't want showing outside of your
frames.

Make your top frame layer active and
erase any part of the frame where you
want your tube to show through.

Merge the three layers together.


4. Copy and paste "butterfly 3", resize
25%, free rotate right 35, add
dropshadow, and place on the top right
corner of your tag.


5. Copy and paste "doodle flower",
resize 50%, duplicate twice, and place
across the top of the frame.

Erase any part that shows inside the
frame.


6. Using "flower rac 1" and "flower rac
2" (resized 35%) duplicated as many
time as you need, make layers showing
the flowers going from this.....

Photobucket

to this.....

Photobucket

Number your layers from "1" up (I used 9).

Hide all flower layers.


7. Open your colour palette.

Set your forground to the darker green
and your background to the lighter blue.

Using your text tool set to Chick 72
stroke width 2, add desired text, convert
to raster layer, add dropshadow, and
place under your frame.


8. Add copyright and watermark.

Resize all layers 80%.


9. In PSP.....

edit > copy special > copy merged


10. In AS.....

edit > paste > as new animation


11. In PSP.....

Make "1" visible.

edit > copy special > copy merged


12. In AS.....

edit > paste > after current frame


13. In PSP.....

Hide "1" and make "2" visible.

edit > copy special > copy merged


14. In AS.....

edit > paste > after current frame


15. Follow the same as above until all of
your flower layers have been copied
over.


16. In AS.....

edit > select all

animation > frame properties (set to 15)

Select the last frame, go back to frame
properties, and set it to 160.

Save and you're finished!

______________________________________

tutorial ©Lynnca March 2009

No reproductions in part or in whole are allowed.

You can use my tutorials for challenges

as long as you provide the link only.

Ahhh..... Spring!

Supplies Needed:
scrapkit: I used "Spring Ah Ling"
by SassyCee which can be
purchased HERE
tube of choice: I used "Ice Cream"
by PinUp Toons which can be
purchased HERE
font: I used Snoopy Snails
which can be downloaded HERE
_________________________

Let's get started!


1. Open a 600 x 600 white canvas.

selections > select all

Copy and paste "paper 8" into selection.


2. Copy and paste "frame 1", resize 25%,
free rotate right 40, place in middle of
tag, and duplicate.


3. Copy and paste your tube, resize if
needed, and place between your two
frame layers.

Erase any part of the tube that you
don't want to have showing outside of
the frame.

Make your top frame layer active and
erase any part of the frame where you
want your tube to show through.

Merge these three layers together and
add dropshadow.


4. Copy and paste "button flower 2",
resize 40%, place underneath your
merged layer, and duplicate as many
times as needed to go around your
frame.

Merge all flower layers together and
erase all of the layer that shows in the
middle of the frame.


5. Set foreground to white and
background to #f334af.

Using your text tool set to Snoopy
Snails 48 stroke width 2, apply desired
text, convert to raster layer, add
dropshadow, and place where desired.


6. Add copyright and watermark.

Resize all layers 80%.

Save and you're finished!

_________________________

tutorial ©Lynnca March 2009
No reproductions in part or in
whole are allowed.
You can use my tutorials for challenges
as long as you provide the link only.


Friday, March 6, 2009

Who? Me?


Supplies Needed:
scrapkit: I used "Demon Circle"
by Maggie's Scraps which can
be purchased HERE
tube of choice: I used "burlesque 04"
by Dominic Marco which can
be purchased HERE
template: I used #7 by GothicButterfly
which can be downloaded HERE
_______________________
Let's get started!

1. Open template, duplicate
(shift + D), close original,
and delete copyright
layer (raster 1).
image > canvas size
(change to 700 x 700)
Floodfill empty part of
background white.

2. Make "circle" your active layer.
selections > select all
selections > float
selections > defloat
selections > invert
Copy and paste "paper 02"
and press delete.
selections > select none
layers > merge > merge down

3. Make "heart 2" your active layer
and follow the same steps as above
but use "paper 03".

4. Make "bow fill" your active layer
and follow the same steps as above
but use "paper 02".

5. Floodfill "skull outline", "skull nose",
"nose", and and "bow outline" with
#a81008.

6. Floodfill "frame 1" and "frame 2"
with #680905.

7. Copy and paste your tube, resize if
needed, add dropshadow, and place
where desired.

8. Copy and paste "bead 03", resize
60%, and place on top of "shape 2".

9. Copy and paste "tag 05", erase as
much of the cord as you can, resize
90%, free rotate left 40, and place on
top of "shape 1".

10. Copy and paste "bow 03", resize
20%, duplicate, and place one on the
bottom left corner of "frame 1", the
other on the top right corner of
"frame 2".

11. Copy and paste "flower 03", resize
35%, duplicate twice and place using
my tag as a reference.

12. Set foreground to null and
background to a colour from
your tube.
Using your text tool set to Bickly Script
48, add desired text, convert to raster
layer, add dropshadow, and place
where desired.

13. Crop empty white space at the top
of your tag.
Add copyright and watermark.
Resize all layers 80%.
Save and you're finished!
_______________________
tutorial ©Lynnca March 2009
No reproductions in part or in
whole are allowed.
You can use my tutorials for challenges
as long as you provide the link only.

You've Been Warned!

Photobucket

Supplies Needed:

scrapkit: I used "Demon Circle" by
Maggie's Scraps which can be
purchased
HERE

tube of choice: I used "FemmeRouge"
by Rachael Huntington which can be
purchased
HERE

Xenofex 2 Constellation

Animation Shop

__________________________

Let's get started!


1. Open a 600 x 600 transparent
canvas.

selections > select all

Copy and paste "paper 07" into
selection.

selections > select none


2. Copy and paste "paper 03", resize
60%, and place in middle of tag.

Duplicate twice, rename "1", "2", and
"3", and apply constellation with the
following settings, making sure to click
on "random seed" each time.

Photobucket

Hide "2" and "3".


3. Copy and paste "criss cross 02",
resize 60%, place on the left side of
"paper 03", duplicate and mirror.


4. Copy and paste "lock 04", resize
50%, place over the criss cross on the
left side, add dropshadow, and erase
part of the lock so that it looks like it's
hanging on the criss cross.


5. Copy and paste "big rose 03", resize
35%, free rotate left 25, duplicate,
mirror, merge the two together,
duplicate, flip, add dropshadow to both
layers.


6. Copy and paste your tube, resize if
needed, add dropshadow, and place in
middle of tag.


7. Set foreground to white and
background to black.

Using your text tool set to Brush Script
48 stroke width 2, add desired text,
convert to raster layer, and place
where desired.


8. Add copyright and watermark.

Resize all layers 80%.


9. In PSP.....

edit > copy special > copy merged


10. In AS.....

edit > paste > as new animation


11. In PSP.....

Hide "1" and make "2" visible.

edit > copy special > copy merged


12. In AS.....

edit > paste > after current frame


13. In PSP.....

Hide "2" and make "3" visible.

edit > copy special > copy merged


14. In AS.....

edit > paste > after current frame

edit > select allanimation > frame properties (set to
15)

Save and you're finished!

__________________________

tutorial ©Lynnca March 2009
No reproductions in part or in
whole are allowed.
You can use my tutorials for challenges
as long as you provide the link only.

Wednesday, March 4, 2009

I'm A Taggin Fool


Supplies Needed:
scrapkit: I used "Suz' All Nighter"
by Created by Jill which can be
purchased
HERE
tube of choice: I used "Coffee"
by PinUp Toons which can be
purchased HERE
font: I used "Iceberg" which can
be downloaded HERE
_________________________________
Let's get started!

1. Open a 600 X 600 white canvas.

2. Copy and paste "frame 3", resize
70%, place in the middle of the frame,
and duplicate.
Using your magic wand, select the
inside of the top frame layer, expand
by 4, invert, copy and paste "paper m",
press delete, and select none.

3. Copy and paste your tube, resize if
needed, add dropshadow, and place
between the two frame layers.
Erase any part of the tube that you
don't want showing outside of the
frame.
Make the top frame layer active and
erase any part where you want the
tube to show through.

4. Copy and paste "label 2", resize
70%, free rotate right 40, add
dropshadow, and place in the bottom
left corner of your frame.

5. Copy and paste "to do list", resize
50%, add dropshadow, free rotate right
15, and place on the top right corner of
your tag.

6. Copy and paste "thumbtack 1",
resize 30%, and place in the top left
corner of your to do list.

7. Copy and paste "leaves", free rotate
left 10, resize 80%, and place on the left
side of the frame, underneath the label
layer.

8. Copy and paste "flower 9", resize
40%, add dropshadow, and place on
the bottom right corner of your tag.

9. Copy and paste "flower 10", resize
25%, add dropshadow, and place on
top of the white flower.

10. Using your text tool set to Iceberg
72, add desired text in a colour from
your tube, convert to raster layer, add
dropshadow, and place where desired.

11. Add copyright and watermark.
Resize all layers 80%.
Save and you're finished!
_________________________________
tutorial ©Lynnca March 2009
No reproductions in part or in
whole are allowed.
You can use my tutorials for challenges
as long as you provide the link only.

PSP Addict


Supplies Needed:
scrapkit: I used "Suz' All Nighter" by
Created by Jill which can be
purchased HERE
tube of choice: I used "BelleStandard"
by Rachael Huntington which can be
purchased HERE
font: I used "Selfish" which can be
downloaded HERE
___________________________
Let's get started!

1. Open a 600 X 600 white canvas.
selections > select all
Copy "paper c" and paste into
selection.
selections > select none

2. Copy and paste "desk", resize 70%,
add dropshadow, and place about
middle of tag.

3. Copy and paste "chair", resize 70%,
place in front of desk, and duplicate.

4. Copy and paste tube, resize as
needed, and place between the two
chair layers.
Make the top chair layer active and
erase any part where you would like
your tube to show through.
Merge your tube and the two chair
layers together and add a dropshadow.

5. Copy and paste "computer", resize
40%, add dropshadow, and place on
desk.
Add a raster layer underneath the
computer layer and paint the area
under the screen black.
Merge the painted layer with the
computer layer.

6. Copy and paste "label 1", resize
25%, free rotate left 40, place on
computer screen, and erase any part of
the label that goes over the reflection
at the top of the screen.

7. Copy and paste "clock", resize 25%,
add dropshadow, and place in top left
corner of your tag.

8. Copy and paste "window", resize
75%, and place behind desk.
9. Set foreground to null and
background to #cd2627.
Using your text tool set to Selfish 72,
add desired text, convert to raster
layer, and add dropshadow.

10. Add copyright and watermark.
Resize all layers 80%.
Save and you're finished!
___________________________
tutorial ©Lynnca March 2009
No reproductions in part or in whole are allowed.
You can use my tutorials for challenges as
long as you provide the link only.

Friday, February 13, 2009

Taking a Little Break

Hello all! I just wanted to let everyone know that I'll be taking a little break, but only until the beginning of March at the latest! I leave tomorrow for Utica, New York to get ready for my gastric bypass that's happening on Tuesday. I'll be home a week from tomorrow, then resting for about a week before spending any real time on the computer. But never fear, my PSP addiction will rear its head and I'll be back making more tuts before you know it!

If you want to read more about my RNY (gastric bypass) journey..... check out my blog........


My RNY Journey

Tuesday, February 10, 2009

Blue Bunny


Supplies Needed
scrapkit: I used "Easter Splender"
by Katelynn's Designs which can be
purchased HERE
tube: I used "Cute Bunny"
by Elias Chatzoudis which can be
purchased HERE
____________________________________________
Let's get started!

1. Open a 600 X 600 white canvas.

2. Copy and paste "jellybean frame 01",
resize 50%, and duplicate.

3. Using your magic wand select the
inside of the top frame, expand by 4, invert,
copy and paste "paper 05", press delete,
and select none.

4. Copy and paste your tube,
place between the two frame layers,
erase any part of the tube that you don't want
showing outside of the frame,
make your top frame layer active,
erase any part of the frame where you want
your tube to show through,
and add a dropshadow to the tube.

5. Copy and paste some of the
Easter eggs and jellybeans, resize 15%,
place them around your tag
in the white space, free rotate
some of them, merge them together,
and add a dropshadow to the merged layer.
You can use my tag for reference
if you wish.

6. Copy and paste "bunny 02",
resize 20%, place in bottom left corner,
duplicate, mirror, and add
dropshadows to both.

7. Copy and paste "single flower 03",
resize 20%, place behind the frame layer,
and duplicate as many times as you need
to place them all around the frame.

8. Set foreground to null and
background to a colour from your tube.
Using your text tool set to Impact 48,
add desired text, convert to raster layer,
apply inner bevel.....
Photobucket
and add dropshadow.

9. Add copyright and watermark.
Resize all layers 80%.
Save and you're finished!
____________________________________________
tutorial ©Lynnca February 2009
No reproductions in part or in whole are allowed.
You can use my tutorials for challenges as
long as you provide the link only.

Hippity Hoppity

Supplies Needed
scrapkit: I used "Easter Splender" by
Katelynn's Designs which can be
purchased
HERE
tube: I used "Easter Bunny" by
Pin Up Toons which can be
purchased HERE
____________________________________
Let's get started!

1. Open a 600 X 600 white canvas.

2. Copy and paste "cardboard frame 01",
resize 60%, copy and paste
"flower ribbon 01", resize it 50%,
and place it on the bottom of the frame.

3. Copy and paste "fuzzy ribbon 01",
resize 47%, place along the top
of the frame, duplicate twice, free rotate
both of the duplicates right 90,
and place along the sides....
underneath the flower ribbon layer.
Merge together everything except
the background and duplicate.

4. Using your magic wand select
the inside of the top frame, expand by 4,
invert, copy and paste "paper 29",
press delete, and select none.

5. Copy and paste your tube,
place between the two frame layers,
erase any part of the tube that you don't
want showing outside of the frame,
make your top frame layer active,
erase any part of the frame where
you want your tube to show through,
and add a dropshadow to the tube.

6. Copy and paste "butterfly 01",
resize 20%, place on top right corner,
duplicate, and mirror.

7. Copy and paste "single flower 02",
resize 10%, add light dropshadow,
duplicate 5 times and place on frame.

8. Set foreground to null and
background to #de5279.
Using your text tool set to Impact 72,
add desired text, convert to raster layer,
place where desired, add inner bevel.....
Photobucket
apply dropshadow.

9. Add copyright and watermark.
Resize all layers 80%.
Save and you're finished!
____________________________________
tutorial ©Lynnca February 2009
No reproductions in part or in whole are allowed.
You can use my tutorials for challenges
as long as you provide the link only.

Monday, February 9, 2009

Let It Snow


Supplies Needed
scrapkit: I used "Penguin Party" by Enigmaz
Dezinz which can be purchased
HERE
tube: I used "Bearskin" by Suzanne Woolcott
which can be purchased
HERE
_______________________________
Let's get started!

1. Open a 600 X 600 white canvas.

2. Copy and paste "frame 4", place in middle
of tag, duplicate, using magic wand select the
inside of the top frame, expand by 4, invert,
copy and paste "paper 9", press delete, and
select none.

3. Copy and paste your tube, resize if needed,
place between the two frame layers, erase any
part of the tube that you don't want showing
outside of the frame, make the top frame layer
active, and erase any part of the frame where
you want the tube to show through.

4. Copy and paste "snowglobe 2", resize 50%,
add dropshadow, and place at the bottom left of
your frame.

5. Copy and paste "polkabow 2", resize 50%,
duplicate as many times as you would like and
place them along the right side of your tag.

6. Set foreground to null and background to
pattern scale 50 using "paper 4".
Using your text tool set to Impact 72, add
desired text, convert to raster layer, apply inner
bevel.....
Photobucket
apply dropshadow of choice, and place where
desired.

7. Add copyright and watermark.
Resize all layers 80%.
Save and you're finished.
_______________________________
tutorial ©Lynnca February 2009
No reproductions in part or in whole are allowed.
You can use my tutorials for challenges
as long as you provide the link only.

Sunday, February 8, 2009

Winter Fun

Photobucket
Supplies Needed
scrapkit: I used "Penguin Party" by Enigmaz
Dezinz which can be purchased
HERE
tube: I used "Ice Skates" by Pin Up Toons
which can be purchased
HERE
font: Mingler Snowy which can be
downloaded HERE
Xenofex 2 Constellation

Animation Shop
_______________________________
Let's get started!

1. Open a 600 X 600 white canvas.

2. Copy and paste "frame 1", and place in
middle of tag.
Using your magic wand, select the inside of the
frame, expand by 4, invert, copy and paste
"paper 2", press delete, and select none.
Duplicate the paper layer twice, rename
"1", "2", and "3".
Apply constellation.....
Photobucket
Hide "2" and "3".

3. Copy and paste tube, add dropshadow,
resize if needed, and place in front of frame.

4. Copy and paste "giftbow 2", resize 60%, add
dropshadow, duplicate, and place on the two
top corners of your frame.

5. Copy and paste "penguin 3", resize 40%,
place on the bottom left corner of your frame,
duplicate, mirror, and add a dropshadow to
both.

6. Copy and paste "snowsign 2" and place on
top of your frame.

7. Set foreground to null and background to
#6394b3.
Using your text tool set to Mingler Snowy 48,
add desired text, convert to raster layer, and
place at the bottom of the tag.

8. Add copyright and watermark, and resize all
layers 80%.

9. In PSP.....
edit > copy special > copy merged

10. In AS.....
edit > paste > as new animation

11. In PSP.....
Hide "1" and make "2" visible.
edit > copy special > copy merged

12. In AS.....
edit > paste > after current frame

13. In PSP.....
Hide "2" and make "3" visible.
edit > copy special > copy merged

14. In AS.....
edit > paste > after current frame
edit > select all
animation > frame properties (set to 15)

15. Save and you're finished!
________________________________________
tutorial ©Lynnca February 2009
No reproductions in part or in whole are allowed.
You can use my tutorials for challenges
as long as you provide the link only.

Saturday, February 7, 2009

Awesome Sale


Fallen For You

Supplies Needed
scrapkit: I used "My Lacy Valentine" by Toni
Scraparoni which can be purchased
HERE
tube: I used the work of Nolan Worthington
which can be purchased
HERE
_________________________________
Let's get started!

1. Open a 600 X 600 white canvas.

2. Set foreground to black and
background to null.
Using your preset shape tool set to rectangle
line width 30, add a frame to your tag and
convert to a raster layer.
Duplicate your frame.

3. Using your magic wand, select the
inside of your top frame layer, expand by 4,
invert, copy and paste "paper 08", press delete,
and select none.

4. Copy and paste your tube, resize if
needed, place between two frame layers,
erase any part of tube that you do not want
showing outside of the frame.
Make your top frame active and erase any part
where you want your tube to show through.

5. Copy and paste "bow 02", add dropshadow,
and place on top right corner of the frame.

6. Copy and paste "flower 02", free rotate left
90, resize 50%, add dropshadow, and place on
top left corner.

7. Copy and paste "beads 02", resize 30%, and
place on top line of frame.
Duplicate, rotate right 90, and place on right
side of frame.
Duplicate this layer and mirror.

8. Copy and paste "pin 04", resize 30%, free
rotate right 30, place on bottom right corner,
and erase a little bit of the pin so that it looks
like it's pinned to the frame.

9. Set foreground to white and
background to black.
Using your text tool set to Edwardian Script 48
stroke width 1, add desired text, convert to
raster layer, and add dropshadow.

10. Add copyright and watermark.
Resize all layers 80%.
Save and you're finished!
___________________________________________

tutorial ©Lynnca February 2009
No reproductions in part or in whole are allowed.
You can use my tutorials for challenges
as long as you provide the link only.